 WaGoZAP
 tutorials
Learn how to use every feature, step by step. Each tutorial has a short video recorded on WhatsApp Web and detailed instructions right below.
1. Getting started: account, install and sign in
- At wagozap.online, choose a plan and create your account with name, email and password. When the free trial is available, your account starts with it.
- Install the extension from the Chrome Web Store: click Add to Chrome and then Add extension.
- Tip: click Chrome's puzzle icon and pin WaGoZAP to the toolbar.
- Open WhatsApp Web in Google Chrome and link your WhatsApp if it isn't linked yet.
- The WaGoZAP sidebar appears on the right. Click the purple button at the top and sign in with your account's email and password.
- Done: the features show up as icons on the sidebar — Schedule, Quick, Customers, Pix, Lists, Blog, Queue, Replies, Metrics, Extras and Account. Click an icon to open it; click again to close.
Messages are sent through WhatsApp Web open on your computer. At the scheduled time, the computer must be on, with Chrome open and WhatsApp Web connected.
2. Schedule messages (once or on several dates)
In the Schedule tab, in four steps:
Step 1 — Recipients
- Open chat: open a chat or group on WhatsApp and click Add.
- Search: type the name or part of the number and click Add on the result. Use the All, Contacts and Groups filters.
- By phone: type the number with the country code. WaGoZAP checks that the number has WhatsApp.
- My Status: on the My Status card, click Add to post on your Status — alone or together with groups and contacts.
- Duplicate names get a warning: check the number before moving on. Click Continue.
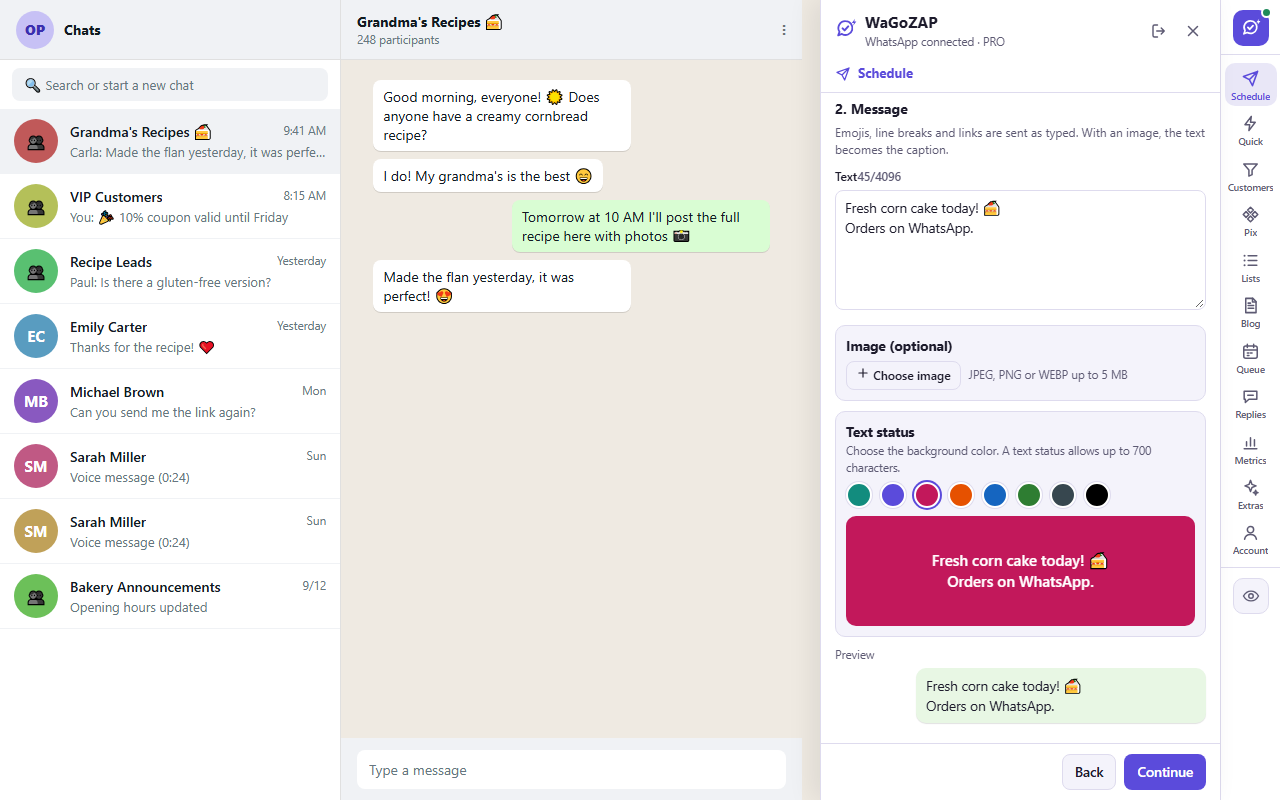
Step 2 — Message
- Write the text. Emojis, line breaks, links and WhatsApp formatting (*bold*, _italic_) are sent as typed.
- Have quick messages? Use the Use a quick message… menu to put the text in the field.
- Optional: under Choose image, attach a JPEG, PNG or WEBP image up to 5 MB. With an image, the text becomes the caption.
- With your Status among the recipients: without an image, pick the background color under Text status (up to 700 characters); with an image, the text becomes the Status caption.
Step 3 — When
- Once: pick the date, time and time zone.
- Several dates (calendar): pick the start and the duration (30, 60 or 90 days). Use the shortcuts Every day, Monday to Friday, Mon, Wed and Fri or Weekends, and click days on the calendar to select or unselect them. Add one or more times.
- The summary shows the full count — e.g. 13 dates × 1 time × 3 recipients = 39 messages — with the first and last send.
Step 4 — Review
- Check the message, image, recipients and dates.
- If the message has a link and your plan includes metrics, keep Track link clicks checked.
- Check I reviewed the content and recipients… and click Confirm schedule. Everything shows up in the Queue.
Messages never go out all at once: between one recipient and the next, WaGoZAP waits a random time (15 to 45 seconds by default). You can change it in Account → Sending preferences.
↑ Back to the index3. Quick messages
For the texts you send all the time: price list, payment details, address, welcome. Available with any account; sending requires an active plan.
- Open the Quick tab (lightning icon).
- Click + New quick message, give it a title and write the text. Or click Add examples to start with three templates and edit them with your details.
- Use
{name}or{first_name}in the text: they become the name of the contact in the open chat. - To use one, open the chat on WhatsApp and choose:
- Send in the open chat: the message goes out right away, already personalized;
- Copy: copies the text so you can paste it (Ctrl+V) and tweak it before sending.
- Use Edit and Delete to keep the list up to date. With many messages, a search box appears.
Quick messages also appear in the Schedule tab, in the Use a quick message… menu.
↑ Back to the index4. Customers: sales pipeline, follow-ups and unanswered chats
Available with any account; the automatic follow-up message requires an active plan. Everything stays on your computer.
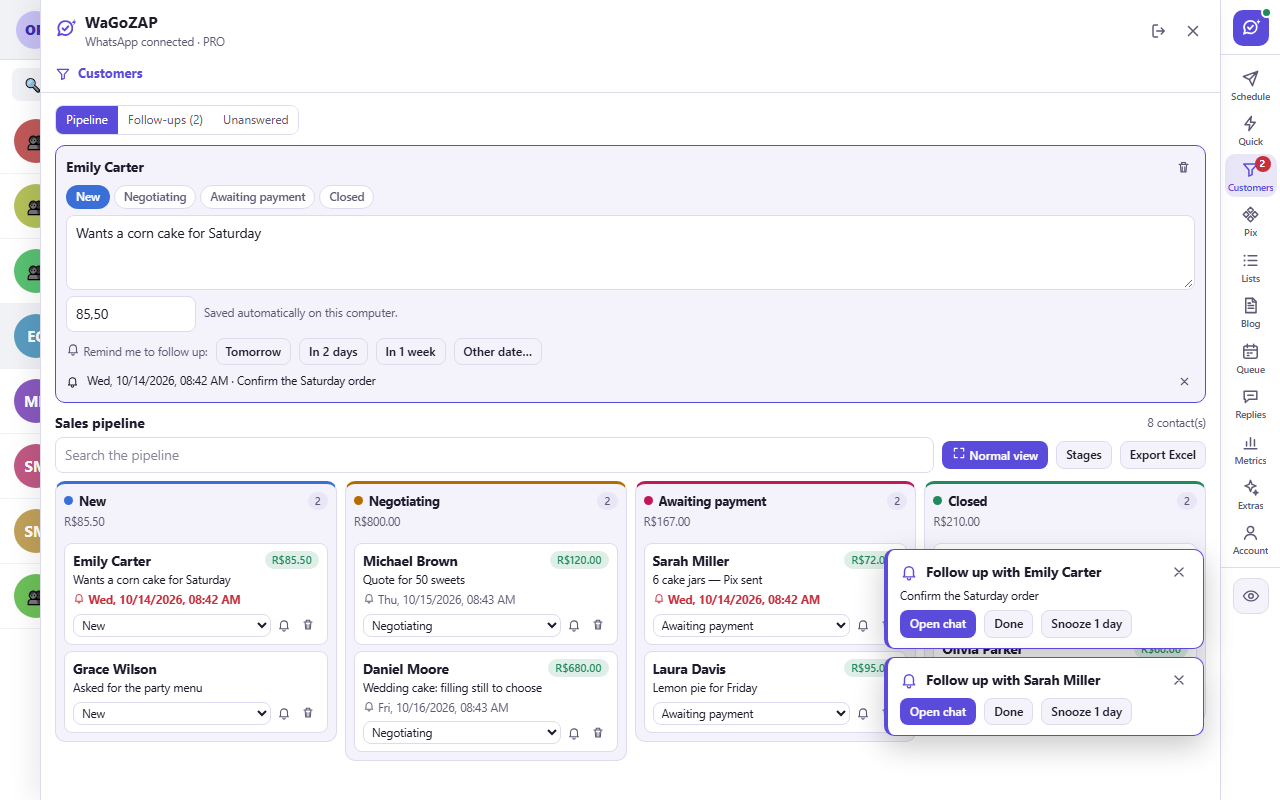
Sales pipeline
- Open the customer's chat on WhatsApp and the Customers tab (funnel icon).
- Choose the stage and click + Add to pipeline. The starting stages are New, Negotiating, Awaiting payment and Closed.
- With the chat open, change the stage in one click, write a note (e.g. "wants size M") and the sale value. Everything is saved automatically.
- On the Sales pipeline board, drag a card from one column to another (or use the Move to menu). Click the name to open the chat. Each column shows how many customers and how much money it holds.
- Use Full screen for a large board, Stages to rename, recolor or create stages, and Export Excel to download the spreadsheet.
Follow-ups (reminders)
- In the open chat, under Remind me to follow up, click Tomorrow, In 2 days, In 1 week or Other date….
- Adjust the date and time and write the reminder for yourself (e.g. "send the quote").
- Optional: check If they have not replied by then, send this message automatically and write the message (you can use {first_name} or a quick message). Click Save reminder.
- At that time, a reminder pops up in WhatsApp Web with Open chat, Done and Snooze 1 day, and the Customers tab shows a number. See them all under Follow-ups.
The automatic message only goes out if the customer has not written since you created the reminder. If the computer was off for more than 12 hours, it is not sent on its own: it becomes a reminder with a Send now button.
Unanswered
- In the Customers tab, open Unanswered.
- Choose Waiting for more than (15 min, 1 hour, 4 hours, 1 day) and see who is waiting, for how long and their last message.
- For each customer: Reply (opens the chat), + Pipeline or Remind.
- At the top, see how many people are waiting now, how many you answered today and your average response time.
Only chats with contacts (not groups) already loaded by WhatsApp Web are included. Nothing leaves your computer.
↑ Back to the index5. Pix payment requests
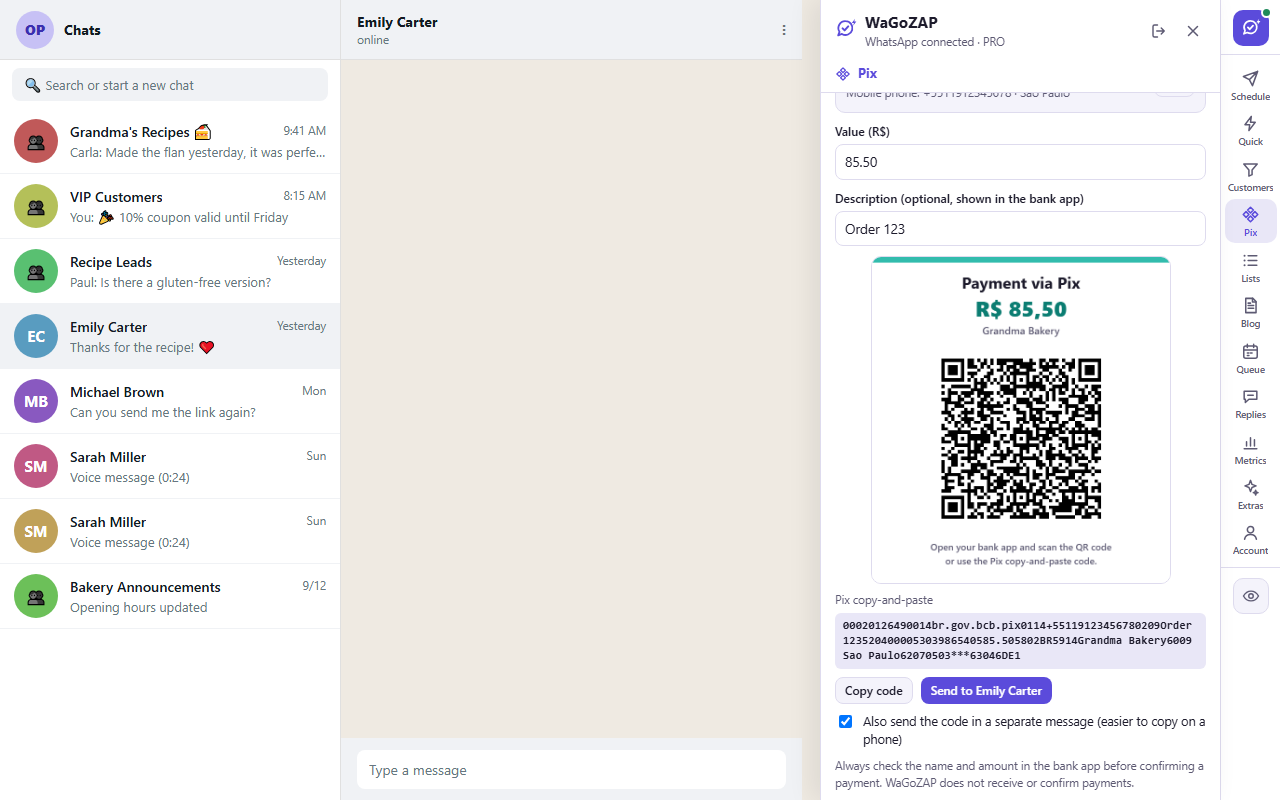
Pix is Brazil's instant payment system. Generate the QR code and the Pix copy-and-paste code and send it in the chat. WaGoZAP only builds the code with your key, in the official Central Bank standard: the payment goes straight to your account, with no fee from us.
- Open the Pix tab (diamonds icon) and, the first time, set up your key: Key type (mobile phone, CPF, CNPJ, email or random key), the Key, the Recipient name and the City. It is saved on your computer only.
- Open the customer's chat on WhatsApp.
- Type the Value (R$) — leave it blank and the payer types the amount — and, optionally, a Description (e.g. "Order 123"), shown in the bank app.
- Check the QR code and click Send to the customer. The image with the QR code goes out and, right after, the copy-and-paste code in a separate message (easy to copy on a phone). Or use Copy code to paste it anywhere.
WaGoZAP does not receive or confirm payments. Check the receipt in your bank app before delivering the order.
↑ Back to the index6. Broadcast lists (Excel)
Available on the PRO plan. A personalized message for each person on your spreadsheet.
1. Spreadsheet
- Open the Lists tab and click Upload spreadsheet. Excel (.xlsx) or CSV — for example, the spreadsheet exported in Extras.
- WaGoZAP finds the name and phone columns by itself. If it gets it wrong, change Phone column and Name column.
- The summary shows how many people are in and how many were left out (invalid phone, duplicate or opted out).
2. Message
- Write the text using
{first_name}or{name}to personalize it. The preview shows how it looks for the first person. - Keep the footer "To stop receiving messages, reply STOP." checked — anyone who replies is removed from your lists automatically.
- Optional: attach an image.
3. When and at what pace
- Pick the start, the minimum and maximum gap between messages and the daily limit. When the limit is reached, sending continues the next day at the same time.
- The summary shows the expected end.
4. Confirm
- Check I confirm the people on this list agreed to receive my messages and click Schedule broadcast. The sends appear in the Queue, where you can cancel the whole batch.
Slow paces protect your number. Start with a few people per day and use lists of people who are already your customers or asked to receive messages.
↑ Back to the index7. Blog calendar (WordPress)
Blogs connected at the same time: Basic 1, Intermediate up to 6 and PRO up to 12. With more than one, the library shows the posts from all of them together (and you can filter by blog).
Connect the blog
- Open the Blog tab and enter the site address (e.g. https://myblog.com).
- Click Test connection and then Connect blog.
- If the blog requires login, use a WordPress application password (Users → Profile → Application passwords), never your main password.
Build the calendar
- Posts: search, filter and check the posts (or Select all).
- Message: edit the template with {title}, {excerpt}, {link}, {category} and {date}. Keep Send the featured image checked. The order of the list is the posting order (↑ ↓).
- Recipients: choose the groups and contacts.
- Calendar: pick the start, the duration (30, 60 or 90 days), the weekdays and the times. Check Repeat to reuse posts. Under Adjust one by one, change the date of any send.
- Review: check everything and click Confirm schedule.
Need something quick? Under Draw posts for tomorrow, WaGoZAP picks the next day's posts for you to review.
↑ Back to the index8. Queue: follow, edit and cancel
- Open the Queue tab. Use the Pending, Attention, Completed and All filters, or search by recipient or text.
- On each send: Edit (text, image, date and time), Send now, Cancel or Cancel batch (all pending sends of the same schedule) and Details (history and WhatsApp confirmation).
- When a send needs attention, the purple WaGoZAP button shows a number.
Statuses: Scheduled (waiting for the time), Confirmed (WhatsApp confirmed it), Expired (the time passed with Chrome closed beyond the tolerance; not sent), Failed (see the reason in Details), Uncertain result (WaGoZAP never resends on its own; check the chat) and Cancelled.
↑ Back to the index9. Auto-replies
Available on the PRO plan. They only work in private chats, never in groups.
- Open the Replies tab and turn on the Auto-replies switch.
- Start in Test mode: what would be replied shows up in the history, without sending. When everything looks right, switch to Live (sends).
- Set up the rules (the first one that applies replies; use ↑ ↓ for priority):
- Greeting: a welcome when someone messages you.
- Keyword: under New keyword rule, enter words such as "price, how much, cost" and the reply.
- Away: lets people know when a message arrives outside your business hours.
- Blog search: if you have a blog, finds the requested post and sends the link.
- Under Test a message, type an example and see what would be replied.
- Under Business hours and limits, adjust the days, times and the interval per contact (default: 5 seconds — follow-up questions are answered right away). The same reply is never repeated to the same person within 10 minutes.
- Click Save changes.
When you reply to a chat manually, auto-replies pause there for a while — you never step on the bot.
↑ Back to the index10. Click metrics
Available on the PRO plan.
- When scheduling, keep Track link clicks checked in the review. Each link becomes a short WaGoZAP link that leads to the same address and counts the clicks.
- Open the Metrics tab and pick the period.
- See clicks per day, the comparison with the previous period, the most clicked links and the source groups. In the full dashboard, export the data.
WhatsApp doesn't tell who clicked: WaGoZAP shows which group and which send the click came from, never the person. Automatic previews and bots are discarded.
↑ Back to the index11. Extras: private mode, background, export and more
Available with any account (some items require the PRO plan, noted below).
- Private mode: blurs the chat list, photos, chat name, messages and the typing field — great for recording your screen or working in public. Choose what to hide and turn it on with the switch or the eye button at the bottom of the sidebar. Hover to reveal.
- Restore removed messages: when on, if someone deletes "for everyone" a message that arrived while it was active, WaGoZAP shows what it said. It stays only on your computer.
- Chat background: choose one of your images as the background.
- Open chat: mark as read or unread, pin and unpin.
- Chat with an unsaved number: type the number and click Open chat.
- Export group members (PRO): check the groups and click Export members to download an Excel spreadsheet with group, name and phone. Numbers hidden by WhatsApp come out blank.
- Export my list: your saved contacts or your group names in Excel.
12. Account, shared plan and preferences
- The Account tab shows whether everything is working, whether WhatsApp Web is connected, the next send, your plan and the sends used this month.
- Share your plan: on plans with more than one computer, copy the access key (WGZ-…) and send it to your team. Each person creates a free account, signs in to the extension and pastes the key under Have an access key?. The plan's computers and monthly sends are shared by everyone. Under My account and plan you see who joined, remove someone or generate a new key.
- Sending preferences: minimum and maximum gap between recipients, delay tolerance and confirmation wait.
- Language: Portuguese, English or Spanish.
- Sign out: use the sign-out icon at the top of the panel or the Sign out button.
13. Good practices to protect your number
- Only message contacts and groups who agreed to receive your messages. Mass messages to strangers and many reports lead to WhatsApp account restrictions.
- Keep gaps between sends and moderate daily limits, especially for lists.
- Always include the opt-out (STOP) in lists.
- Keep the computer on with Chrome and WhatsApp Web open at the scheduled times.
- Start auto-replies in Test mode.
Still have questions? See Support or the FAQ.
WhatsApp is a trademark of WhatsApp LLC / Meta Platforms, Inc. WaGoZAP is independent and is not affiliated with, sponsored or endorsed by WhatsApp or Meta.